Simple perspective projection
This example will show a basic perspective projection. This is the meat of the transform function, which can be found in math.js.
Coordinate system
First we need a 3D coordinate system. The coordinate system will have a x-axis, y-axis, and z-axis.
Any point $P$ within the coordinate system can be indicated with a vector, which is notated as $\vec{v} = [x, y, z]$, where $x,y,z \in \mathbb{R}$.
 The point $P$ is then transformed to a 2D coordinate system, in our case the canvas element. The $z$ element is used to apply the perspective to $x$ and $y$.
Cube
We will need an object which we can project. A simple example is a cube. A cube exists out of vertices, edges and faces.
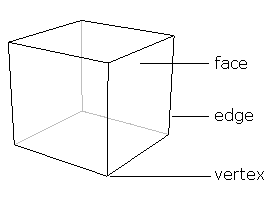 To keep it simple, we will only define the vertices and edges.
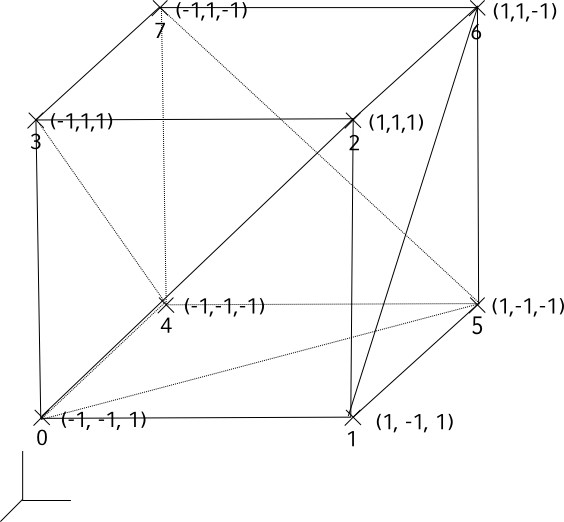
The center of the cube is at the origin, which is vector $[0, 0, 0]$.
The vertices are around the origin. An example for a vertex is $[1,1,1]$. Labeling all the vertices gives:
To keep it simple, we will only define the vertices and edges.
The center of the cube is at the origin, which is vector $[0, 0, 0]$.
The vertices are around the origin. An example for a vertex is $[1,1,1]$. Labeling all the vertices gives:
 Let's define the cube, so we can use it later on.
            var cube = {
                vertices: [ [-1,-1,1], [1,-1,1], [1,1,1], [-1,1,1], [-1,-1,-1], [1,-1,-1], [1,1,-1], [-1,1,-1] ],
                edges: [ [0,1], [1,2], [2,3], [3,0], [4, 5], [5,6], [6,7], [7,4], [3,7], [2,6], [0,4], [1,5] ]
            };
Camera
We also need a camera, which is used to move around in the 3D coordinate system. For simplicity, we will define a camera at position $[0,0,-5]$.
var camera = [0,0,-5];
Keep in mind that the camera is not moving; the objects are moving.
Perspective projection
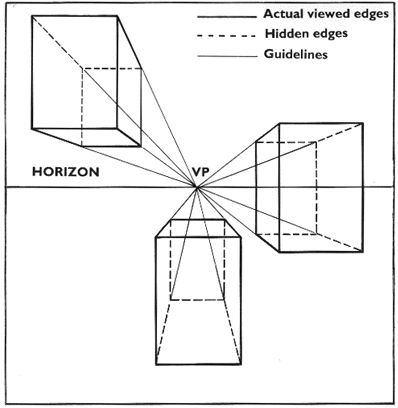
Alright, we are going to do the perspective projection. The idea is to create a vanishing point for the $z$ coordinate. A nice illustration is:
 As an example, we will calculate this by hand, for a point $P$ positioned at $[1,1,1]$.
The formula to project from 3D to 2D is:
$$ \begin{bmatrix}x\\y\\z\end{bmatrix} \implies \begin{bmatrix} x \cdot \dfrac{\text{fov}}{z} \\ y \cdot \dfrac{\text{fov}}{z}\end{bmatrix} $$
where $\text{fov}$ is the width or height of our 2D space.
For example, if our canvas is $w=800$ and $h=600$, the $\text{fov}$ we will use, is: $600$. Use whichever is smaller: $\text{fov} = \min(w,h)$.
To take our camera into account, we first add the camera position to $P$:
$$ P_{\text{camera}} = \begin{bmatrix} P_x + \text{camera}_x \\ P_y + \text{camera}_y \\ P_z + \text{camera}_z\end{bmatrix}. $$
Plugging this back into the projection equation, gives:
$$ P_{\text{projected}} = \begin{bmatrix} (P_x + \text{camera}_x) \cdot \dfrac{\text{fov}}{P_z + \text{camera}_z} \\ (P_y + \text{camera}_y) \cdot \dfrac{\text{fov}}{P_z + \text{camera}_z} \end{bmatrix}. $$
To transform $P$, we plug the values into the equation:
$$ P_{\text{projected}} = \begin{bmatrix} (1 + 0) \cdot \dfrac{\text{600}}{1 + (-5)} \\ (1 + 0) \cdot \dfrac{\text{600}}{1 + (-5)} \end{bmatrix} $$
which gives us our point in 2D space, positioned at $[-150, -150]$.
As an example, we will calculate this by hand, for a point $P$ positioned at $[1,1,1]$.
The formula to project from 3D to 2D is:
$$ \begin{bmatrix}x\\y\\z\end{bmatrix} \implies \begin{bmatrix} x \cdot \dfrac{\text{fov}}{z} \\ y \cdot \dfrac{\text{fov}}{z}\end{bmatrix} $$
where $\text{fov}$ is the width or height of our 2D space.
For example, if our canvas is $w=800$ and $h=600$, the $\text{fov}$ we will use, is: $600$. Use whichever is smaller: $\text{fov} = \min(w,h)$.
To take our camera into account, we first add the camera position to $P$:
$$ P_{\text{camera}} = \begin{bmatrix} P_x + \text{camera}_x \\ P_y + \text{camera}_y \\ P_z + \text{camera}_z\end{bmatrix}. $$
Plugging this back into the projection equation, gives:
$$ P_{\text{projected}} = \begin{bmatrix} (P_x + \text{camera}_x) \cdot \dfrac{\text{fov}}{P_z + \text{camera}_z} \\ (P_y + \text{camera}_y) \cdot \dfrac{\text{fov}}{P_z + \text{camera}_z} \end{bmatrix}. $$
To transform $P$, we plug the values into the equation:
$$ P_{\text{projected}} = \begin{bmatrix} (1 + 0) \cdot \dfrac{\text{600}}{1 + (-5)} \\ (1 + 0) \cdot \dfrac{\text{600}}{1 + (-5)} \end{bmatrix} $$
which gives us our point in 2D space, positioned at $[-150, -150]$.
Drawing the cube
To draw the cube, we will look at each edge in the cube.
Each edge has two vertices: $\vec{v}$ and $\vec{u}$ which need to be transformed from 3D to 2D.
First we add the camera position to the vertices $\vec{v}$ and $\vec{u}$.
Then we apply the transformation to $\vec{v}$ and $\vec{u}$ to find the 2D coordinates.
Additionally, because canvas is centered on the top-left, and we want it in the center, we need to add an offset to $x$ and $y$.
Finally, we draw a line between the two vertices.
We start with initiating the canvas object. We will set a width, height, and the colors.
var canvas = document.getElementById("example1");
canvas.width = 650;
canvas.height = 400;
var ctx = canvas.getContext("2d");
ctx.fillStyle = "#fff";
ctx.strokeStyle = "#000";
var fov = Math.min(canvas.width, canvas.height);
Because the canvas is centered in the top-left, and we want it in the center, we apply an offset to the $x$ and $y$ coordinates.
In other words, the point $[0,0,0]$ should be in the center of the screen.
var canvasOffsetX = canvas.width / 2;
var canvasOffsetY = canvas.height / 2;
Then we create a function transform, that will apply the perspective projection.
var transform = function(v) {
    var f = fov / v[2];
    return [v[0] * f, v[1] * f];
}
Another function, add, which adds two vectors (vector-addition). This is used to add the camera position to the vertex.
var add = function(v,u) {
    return [v[0] + u[0], v[1] + u[1], v[2] + u[2]];
}
This is optional, and can be left out. I am using it to rotate the cube, as animation.
If you want to know how it works, Google is your friend.
var rotateY = function(v, angle) {
    return [v[0] * Math.cos(angle) - v[2] * Math.sin(angle),
            v[1],
            v[0] * Math.sin(angle) + v[2] * Math.cos(angle)];
}
Finally, the main drawing loop. First we clear the screen. Then we apply the rotation to the cube's vertices.
We also want to find the edges, and their vertices, add the camera position, and transform them. Finally, we draw a line between the two transformed points.
var draw = function() {
    requestAnimationFrame(draw);

    // Clear the canvas.
    ctx.fillRect(0, 0, innerWidth, innerHeight);

    // Rotate the cube.
    for(var i=0; i < cube.vertices.length; i++) {
        cube.vertices[i] = rotateY(cube.vertices[i], 0.01);
    }

    // Find all the edges, transform the vertices, and draw a line.
    for(var i=0; i < cube.edges.length; i++) {
        // Draw cube.
        var edge = cube.edges[i];
        var v = transform(add(cube.vertices[edge[0]], camera));
        var u = transform(add(cube.vertices[edge[1]], camera));
        ctx.beginPath();
        ctx.moveTo(v[0] + canvasOffsetX, v[1] + canvasOffsetY);
        ctx.lineTo(u[0] + canvasOffsetX, u[1] + canvasOffsetY);
        ctx.stroke();
    }
}
Having everything in place, we simply call:
draw();
Voila, there it is! Which is also, sadly, the end of the explanation. Because I only wanted to show the basic projection, topics such as drawing the faces, painter's algorithm, and animations are left out.
It is important to note that perhaps the orientation of the coordinate system is flipped, but verifying and fixing that is left as an excercise for the reader.
Excercises
- Modify the code to add the diagonal edges. The first edge can be added by opening the console (F12), and pasting:
cube.edges.push([1,6]).
- If the $\text{fov}=10$, and the camera is at $[0,0,-3]$, calculate all the projected vertices of the cube. Draw all the points on a piece of paper, and connect them.
References
Images shamelessly stolen from Google. Style from bettermotherfuckingwebsite.com.